Blog article about the new RICOH GR IV Monochrome camera and my first experience with this camera.
Read MoreSensuality in Nude Photography or What Kisilda Did
Since I started shooting nudes, I have been trying to shoot the nude body as an extension of creating portraits. As a way of giving the nude body expression by pointing out the character of my model.
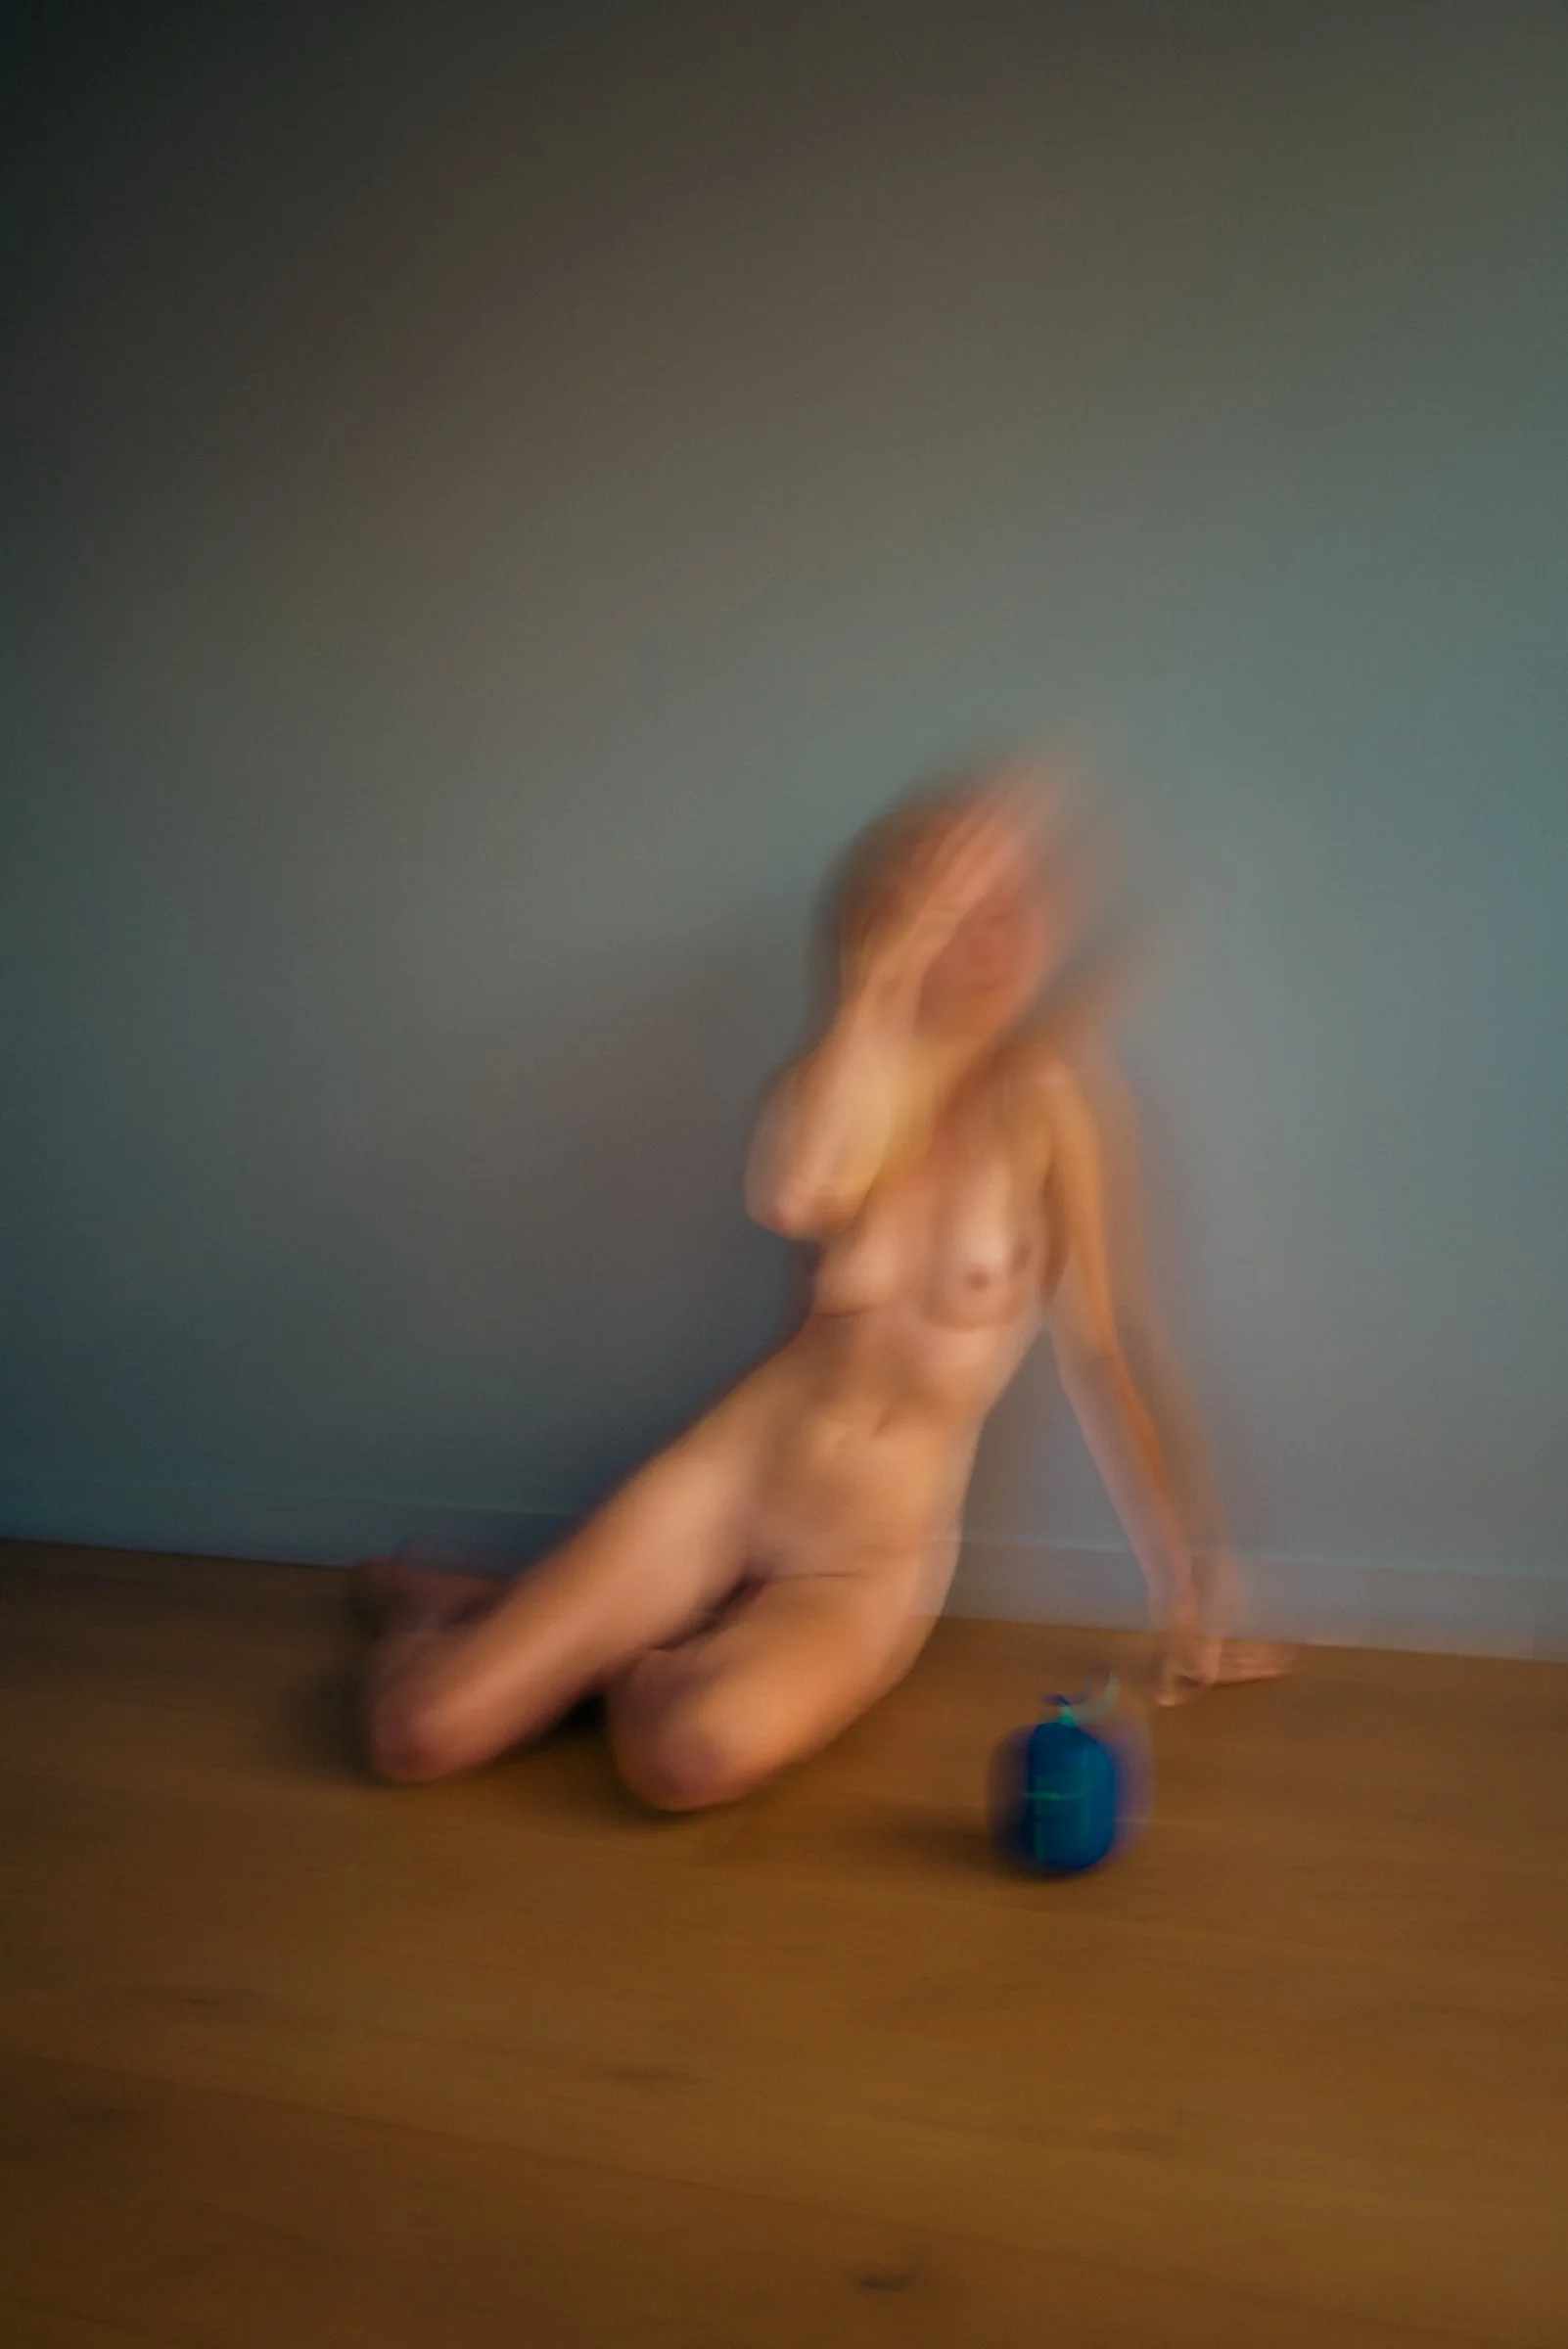
When I shoot portraits, I usually combine an “Inner Core” session with shooting conventional portraits or nude portraits. This means that I start a photo session by asking my model to do an activity that gets her or him as closely as possible to their feelings of that very moment. This can be by doing an activity like dancing, yoga, or just by sensing what kind of feelings my model can discover inside in that very moment. Following these feelings I start taking pictures with long exposure times.
If you are interested in this process you might want to read some blog articles on this website about the Inner Core Project.
This way of starting a photo shoot, let it be portrait or a nude session can be confusing or sometimes even irritating for my models. Particularly professional models have learned to “pose”, to take a certain body position with a particular expression that they hold for a moment to give the photographer the opportunity to take a good picture without running the risk of motion blurred pictures. Asking to express their feelings of that very moment instead of striking a pose can be indeed confusing. However, it is a great gateway into shooting pictures with natural expression.
Now let’s talk about sensuality. The way I just described a photo shoot, it sounds reasonable that for the models who are trying to tap into their feelings of that very moment, sensuality is not what will occur to them immediately. In an often unknown environment, with a photographer that they have not met before, being asked to tap into their feelings, sensuality will not be the first thing they will bump into. And I am ok with that. I’m not aiming at evoking sensual feelings but a natural flow, whatever comes up in a photo shoot. I leave it open to the model where they are heading.
And then there was Kisilda. Kisilda is a young photo model from Athens. I shot with her in May 2024. As many photo models in Athens, she uses modeling as a way of adding some income to their relatively small portfolio. Kisilda agreed to having the photo shoot at my apartment in Athens. As she doesn’t have a car, we agreed to me picking her up from the Metro station and to walk together to my place. During that walk she came across as a shy, a little insecure person who did not give away about very much herself in our first conversation.
Confronted with my request to express herself during the photo shoot instead of striking the usual poses, she found it difficult to find a starting point. We started slowly with some portraits in underwear. But very soon she had the knack of the idea and what followed then was a firework of expressions, movements, crazy ideas and silly behavior that was a joy to follow and capture.

She behaved naturally and without inhibition. And that also in the way she expressed her nudity during the shooting. It was as if she was flirting with the camera. That way we created a beautiful series of sensual pictures without me trying to prompt or urge her in any way.

After that photo shoot I had the feeling “what the heck was that?”, and I was thinking that it was far too fast, too distracted, in a way all over the place. And that was indeed the case. But the pictures that we created were beautiful with a great variety of feelings and expression. And with a natural sensuality that the viewer can perceive in the pictures of this photo shoot.

Leica Q3-43 A Crazy Decision
I bought a Leica Q3-43. Really?? Really.
It was not a well considered decision. I did not even know about the camera and that Leica was about to develop a Q with a “normal” 43 mm lens. I did not search for information about it. It just happened.
YouTube’s algorithm in its wisdom sent me a link to Hugh Brownstone’s “3 Blind Men and an Elephant” review of a new Leica Q camera with a lens that realizes exactly the angle of view of the human eye. So what?

Hugh praised the camera. He applauded Leica. He ordered the camera. He triggered his audience. And he triggered me. I took a look at the first few online reviews of the camera (it turned out it had been delivered to retailers just 3 days before I read for the first time about it). They were stellar. The only downside was the usual one that the price is….. astronomical.
I own a Leica Q2 that I bought during Covid 4 years ago. And I love it. And I wrote about it. And I used it a lot. And I also don’t like 50mm lenses. Somehow they don’t seem to fulfill my eyes’ and brains need for a “normal lens”. I cannot even exactly say why, but I never felt entirely comfortable using a 50mm lens. For portraits until now I clearly preferred my Nikon 85mm f/1.8 lens.
And now a camera with a 43 mm lens, a compact size and a moderate weight. Improved autofocus. And a f/2 lens who’s pictures look more like a f/1.4 lens. Said the reports.

24 hours later I had ordered one from the Leica Store in Sydney. 2 days later it arrived at the post office around the corner. I will not describe in any detail how Australian Mail’s parcel Service “Starship” fucked up the one workday delivery of this camera. They have 99% bad reviews for their service. I completely understand why. But that only as a side line.
Now, 2 weeks and 1000 pictures later, I am a fan of the Leica Q3. It is amazing. The pictures are stunning. They have a sharpness not for shapness’s sake but to deliver a nearly 3 D like picture that is just amazing. The pictures have a microcontrast that is absolutely fabulous. I am using this term “microcontrast” because I have no better way of describing it. The pictures pop, they look gorgeous, have a beautiful colour rendering and are just fantastic. And 43mm seem to be for me a more acceptable lens width that I feel more comfortable with.

I am not a Leica fanboy. I use cameras in order to achieve a good result. I want files that I can edit without fearing that they fall digitally apart. I want a camera that I can use everyday and that enables me to shoot portraits, street work, landscapes, sunset, sunrises, macros and motion blur pictures alike. This is a camera that provides all that in one piece.
And I know that a good camera does not turn me into a better photographer. But it gives me the freedom of having a device that is not in my way when it comes to shooting and editing pictures. A device that does what I want it to do. And where technical limitations are not the reason for pictures that don’t look good (it is my own photographic ability that is the limiting factor; that is a good reason to try to grow).
Do we “need” a Leica Q3 camera for an exorbitant retail price? Definitely not! Do we have alternative cameras for a much more moderate price? Absolutely yes. Nikon’s Z8 is a great example. Is it a joy to use the Leica Q3-43 and to regard the results of those attempts? Yes and yes again.
I bought it. I use it. I love it.
I will write again about it after some more months.
Kisilda - Photo shoot in Athens in May 2024
I need to tell you about the photo shoot with Kisilda in May. I’m writing this in August, so the story has been in the becoming for a while. And I will explain why.
Kisilda approached me via Model Mayhem. MM is a US based website that connects photo models with photographers and other the genre surrounding artists like makeup and hair stylists, professional photo editors, photo studios etc. After having created a portfolio it happens that as a photographer you get approached by models who are interested in your photographic style and who - of course - also want to earn some money by approaching you.
That’s what happened with Kisilda. She is a non professional model, based in Athens, Greece who appears to enjoy being photographed, trying herself out in the field by posing for portrait and artistic nude photo shoots and who finds working as a model a way of earning money in the tough Athenian professional environment.
So she contacted me, I found her portfolio interesting and we made an appointment at my little apartment in Marousi, a suburb of Athens 15 km outside of the CBD. This was the first surprise to me. She agreed to shoot at my place without knowing me, without having any person vouching for me and without having a person accompanying her. I picked her up from the Maroussi metro station and we walked together to my place.
When walking together it turned out that that Kisilda is a quite shy girl who did not find it easy to tell a previously to her unknown person about herself, her story and her work as a photo model. “It must be difficult as a shy person to expose yourself in a photo shoot” I was thinking.
Kisilda had brought some clothes and lingerie for the photo shoot that she showed me at the apartment. She asked me if I would be ok with her wearing these things. And from then it became interesting.
I told Kisilda about my approach to model photography and that I am not interested in my model to strike a pose that I can then capture. My approach is much more that of asking the model to express what she feels during the photo shoot. I am interested in the expression of real emotions during the photo shoot. Particularly at the beginning of a photo shoot this requirement puzzles many models. I give no direction. I ask my model to show me what she feels, let it be surprise, embassement, annoyance, fascination, indifference, whatever emotion comes up that very moment.

Every somewhat experienced model that I worked with found this request difficult to fulfill. A model usually has a certain set of poses and movements available that they use during a photo shoot. It is about showing a posture or a facial expression that a model holds for a few seconds to give the photographer the opportunity to catch that moment and to shoot. Then the model continues to the next pose.
I am definitely not interested in this approach. My goal is to take pictures of a person in a certain situation. It’s about being genuine and to show what is there inside and out. Of course this is difficult, particularly in a situation where model and photographer have never met before. You remove the protective barrier of poses and ask the model to be naked inside and out. That is nearly impossible, at least at the beginning of a photo shoot.
I do help my models by making suggestions how to express themselves in this situation and that any emotion, also so called “negative” ones are acceptable. But I don’t retract my request excuse I want to see an authentic person.
Kisilda was initially not sure what to do with this. She chose to try some dance movements. Over the time she gained more confidence and then she was playing and showing whatever crossed her mind. We were laughing, joking, she took silly poses and poked out her tongue - baehh…!!

Admittedly the out of focus was not on purpose....
We did one session with slow shutter speed motion blur pictures with my Leica Q2 and one with the Nikon Z8 and 50 and 85mm lens for portrait shots. The shooting was a little chaotic and erratic, but that was what I had asked for.

Kisilda undressing. In post I added some colour grading and added some texture.
We shot all in all for about 3 hours which is longer than usual. A photo shoot takes me usually 2 hours give and take. Towards the end we had both the feeling that we had done whatever we could to create something nice and unique.
When I looked at the pictures in the evening, I was quite disappointed. I could find the chaos in the pictures that I experienced during the shooting but nothing really compelling or interesting. It felt that lots of pictures needed to be discarded, either because they were technically bad or because my model did not show an interesting pose or expression. Later I deleted over 600 of the approximately 2000 pictures that I had shot with both cameras together.
I put the files on the hard drive and there I left them for 3 months. I had to work to earn money and there was absolutely no time to look at them again or to start editing.
When I took the first look after 3 months I was absolutely surprised. What I found were pictures with soul, with vibrancy and variety of mood and expression. We had created spontaneous pictures that reflected the mood of the moment and also the inventiveness of my model regarding use of the place and furniture and even light (what happens when you put a chair underneath the corridor lamp, the nude model climbs on the chair and makes use of light and shadow in this completely “unphotographical” environment? It’s amazing!!).

Kisilda on a chair underneath the corridor light
The outcome was great! Thank you Kisilda for being brave and natural and silly and interested in taking that path!.
Daido Moriyama - Provoke
In the past weeks I have have been watching documentaries about the photographer Daido Moriyama. He is one of the formerly wild and provocative Japanese photographers who created the “Provoke” movement in the 1960s. (https://en.wikipedia.org/wiki/Daidō_Moriyama)
As you know I love playing with motion blur and strong contrasts in black and white images. And I love the Provoke app on my iPhone for its raw and gritty black and white rendering. So it makes sense to take my little (and recently underused) Ricoh GRIII camera, set it to black and white contrasty JPEG wit an exposure time of 1/15 second and to go out and try what happens.
Ands what happened was a liberating experience of not needing to focus on composition or technically “correct” or perfect pictures. I shot what caught my eye, created pictures only with my gut feeling and some kind of visceral sense of the situation.

Visceral and intuitive shooting
Moriyama emphasises that you need to go out and shoot a lot in order to create quality work. And yes, I can confirm that. On my first evening I shot 140 pictures and out of those I will probably use between 3 and 5.
But this is not about numbers anyway. it is about following the atmosphere of the street, the way poeple move, the compositions that accidentally fall into place. It is about collecting what life presents to us in all its variety in every moment of our lives. The liberation of this is the fact that things just happen, and we become a part of the events and every moments that occur around us, and we record them (Moriyama said “copy them”) by taking pictures.
Intuition. Raw energy. Expression. Coincidence. Happenstance. Fleeting moments caught in photographs.
I need to admit that my current location, Mackay in Queensland is not the most conducive place for this type of photography. You would probably associate it with the restless and energetic big city life as Moriyama found it in Tokyo. But it is not impossible, it still works, even in a more rural or small town environment.
I am surprised that I did not start putting these components together sooner. Long exposure, contrasty black and white images, intuitive shooting - all these things I loved for a long time. But sometimes things just take time and we can only act on what is due.
Photography at Experimenta Studio in Athens
The past 6 weeks, September and October 2023, I spent on holidays in Athens. After two and a half years of Covid related asbsence, it was time to revisit the place where I used to live from 2015 and to visit the friends that I had made during that time.
So I arrived and got in touch with my friends. And then it became crazy. And amazing. And exhilarating.
Thekla, the actress that I had my very first motion blur nude photo shoot with back in 2019, had created her own dance and acting studio called “Experimenta” in Athens. She opened the studio 4 months before my arrival and she had already assembled a group of dancers, actors, body movement teachers, healers and experimentors around herself and the place.
Thekla asked me if I could photographically support her and her concept for the studio by taking pictures of the teachers she is working with. She wants to use the pictures to promote her studio on posters and online.
So all of a sudden I got into semi-professional photography and for 3 weeks I had shooting after shooting, all in all over 10 appointments with people who were willing and interested in showing themselves and performing for the camera.
This was an amazing opportunity for me to develop my portrait shooting skills on an improvisatory basis. This was not about people posing for the camera. This was the camera following the performers, trying to catch them in the act and to reflect the atmosphere of creativity and passion that is happening at this studio.
Although happening at a studio, this was not a controlled environment where I could direct people according to my photographic ideas. It were rather spontaneous performances where the photographer was the audience and could participate by recording the events. Technically this was immensely challenging as movements and to a big degree light conditions were out of my control. But having the chance of observing and recording these performances of professional artists was a unique and immensely satisfying opportunity.
I also had the opportunity to do several Inner Core shootings and to try out this concept with my participants.
All of a sudden, during a holiday in sunny Greece, my dream of a creative artistic environment came true and I could use my cameras for both, my own artistic purposes and for somebody who wanted pictures for professional reasons.
I am a lucky, happy man…..
Creative Shooting with R.
Some few weeks ago I had a photo shoot with R., who is a professional photo model in Auckland.
She had approached me after finding me on Model Mayhem and taking a look at my website. She was particularly interested in the Inner Core Project and wanted to participate in it.
So we made out an appointment at my Airbnb place during my stay in Auckland. Our agreement was, that she wanted to participate in the project, shooting in underwear and possibly do some nude shooting if we protected her identity in these pictures.
R. has been working as a professional model for 15 years and she exuded both, curiosity in something new that she was keen to try out and extreme experience and professionalism in her work.
So we did Inner Core. And she surprised and baffled me because her approach was completely different from anything I had experienced with Inner Core shootings before. She just posed. She did her usual model routine and let me shoot this with long exposure. And as one of my core principles with the project is, not to interfere with my collaborators, I just followed her with my camera.
What we developed then was a lovely playful way of trying things out and playing with props and poses. She was intested in trying Inner Core in the nude and we started using fabrics, props like a chair, a kettle, a Boom Box.
Nude with Boom Box, face palming
I eventually suggested to her to slow down her model routine and to focus on how she felt and how she wanted to express herself. That surprised and baffled her in return because I was breaking up her routine (and I did not adhere to my principle of non-interference).

R., Inner Core Image
So we animated each other during the shooting process and it became a creative and real fun experience for both of us.
The outcome were all in all 12 series of long exposure motion blur pictures and also 2 series of portrait pictures that I shot with the “big camera”, the Nikon D850 with the 85mm portrait lens.
The problem when starting to edit the picture became obvious very quickly. It will be very difficult to maintain my model’s anonymity in the resulting pictures because we created a wild mix of blurred and non blurred nude and non nude pictures.
I love the outcome of this photo shoot. It is as wild and creative (and fun) as the whole shooting was. I will need to ask R. how she wants to handle the resulting pictures. The Inner Core pictures will be no problem I guess as they are blurred and don’t disclose the identity of my model. But what about the others? I will discuss this with her and we will see…
Photo Shoot with Miss Renee Rose
Some weeks ago I was approached by a Palmerston North based Kiwi photo model via Model Mayhem. She was about to travel to Wellington for a shooting tour. I asked her if she was interested in an Inner Core and nude portrait shooting session and it turned out that she was.
In the past months my problem had been that I could not find people in Wellington who were interested in participating in my “Inner Core Project” or portraits, let alone nude shootings. So I decided to pay for her as a professional model instead of waiting longer for a free opportunity that might not come at all.
She had rented an Airbnb cottage in Wellington where the shooting could happen. It turned out that the place was very small which limited our opportunities of shooting from several angles. But the environment and light were nice.

Miss Renee Rose - Soft Pastel Colour Portrait
Miss Renee Rose is a model who has been doing photo work for 8 years. But it turned out that she had never done a nude shooting before. She told me that she wanted to venture into that part of modelling as part of her personal development and to become more confident and comfortable with herself. She wanted to push herself and try something that was out of her usual comfort zone. So she was a little nervous when we were meeting and she frankly admitted it.
We were able to create a nice and relaxed working atmosphere together and it felt good and safe and it was obvious that after the first nervousness Renee was feeling all right.

Miss Renee Rose - Soft Nude
After having dived deeper into model shooting I can clearly say that creating a good mood, a nice and particularly safe atmosphere is most important if you want to get good photos. You want your model to be relaxed and confident and trusting you as a photographer and person. I think, working with a person who “exposes” herself to us as photographers is a privilege that we should honor.
We had arranged for a 2 hour session and started with an Inner Core component. (If you would like to know more about the “Inner Core Project”, please take a look at the articles about it here in the blog.) Renee had brought some meditative music that she used to approach herself on a deeper level. After about 30 minutes she found that she had explored that part sufficiently. So we continued to the portrait and nude part of our work.
We had a lot of time to try out different poses, some garments that Renee had brought and also to explore her own ideas as well. It was easy and nice to work with Renee Rose and we both liked the collaborative way in which we could create pictures.
Renee Rose came across as a very sweet and soft person with cautious movements during the shooting process. This made me think that my usual contrasty and sometimes even raw editing style might not be the suitable in her case. So I thought about a soft, pastel toned editing scheme instead. I created a Lightroom preset with a soft rosé color combination. I had never used pastel colors in the past, but in Renee’s case it seemed to fit very well. She liked the style when she saw the first trial picture.

Miss Renee Rose - A “non-posy” pose - I love this picture!
Meeting Renee Rose was a lovely experience. I enjoyed working with her and I am very happy with the pictures that we could create together. And I learned a lot about the intricacies of modeling in the nude.
Thank you Renee Rose!
Here you find Miss Renee Rose’s Website, Instagram account and Facebook account, just click on the link.
Miss Renee Rose Website
Miss Renee Rose Instagram
Miss Renee Rose Facebook
Kalopsia - The Inner Core Session
Description of a model photo shoot in Toronto, Canada for the Inner Core Project with the amazing model Kalopsia.
Read MoreIn Toronto
I am in Toronto! I am in the big city!
I was invited by a friend (who decided to stay in the shadow and for me not to disclose anything about him/her). The planning for this travel had been going on for many months with me contemplating photography in the city, shooting street, urban architecture and also models. Having been starving photographically in the past year in Wellington, New Zealand (mainly with regard to portrait, nude and Inner Core sessions which were very difficult to organize there) I had high hopes that it might be easier to shoot in a big cosmopolitan city.
And after 10 days of experiencing the city, of shooting, of trying out and of working with professional models I can confirm that what I had hoped for really, really happened. It has been an amazing and very fulfilling experience.
It seems that people in Toronto are very relaxed with regard to having their picture taken. Working with professional models appears to be easy and shooting people in the streets is a relaxed and cheerful experience. I am more than pleased.
In a city that you don’t know you want to go to the places that tourists are supposed to visit. So we visited museums, strolled through the city center, had a good look at Union Station, admired the Lake Ontario views and drove the 100 kilometers to the Niagara Falls and I behaved as a tourist in this megapolis is supposed to behave.
I realized that in order to go from Toronto to the surrounding cities like Oakville or Missisauga you don’t use country roads (as I had imagined) but huge highways with 5 to 7 lanes in each direction. There is absolutely no romantic feeling if you travel around Toronto in a 50 km radius. If you get further outside you will discover beautiful landscapes, vineyards, hills and mountains and beautiful picturesque little towns (for example Niagara on the Lake) that are worth a visit.
So I had my share in the experience of being a tourist in Toronto and its sourrounding area. But particularly I could experience photography on a new and different level. I will report on particular photo shoots in separate blog articles. So thank you heaps to my friend who made all this possible and who relentlessly supported me and organized so many events and photo shoots.
Editing the dancer series
When I do a photo shoot, and particularly so when I shoot poeple I am waiting for the pictures to tell me what they want me to do with them in post-processing. I don’t have a particular workflow or one particular way to plan the outcome of my editing. It is more as if I am waiting for the pictures to give me instructions about how they want to be treated. I often try several different ways of processing them until I find one way that seems to be suitable.
With Sarah’s dance pictures (please read the previous blog article about the shooting with Sarah) it was a very interesting experience. One week after the shooting I sat down and started playing with the pictures that I had uploaded to my hard drive. And out of this playing an editing process emerged that was very different from what I usually do with my pictures.
I usually process my pictures in black and white and I have certain Photoshop tools that I use to enhance the blur effect. But these pictures evolved effortlessly into colour and I just followed the path. The result is very different from what I had expected. I thought, the pictures might look quite naturalistic and represent Sarah’s natural dancing style. But what happened was that they are very intensely processed so that sometimes it is not even recognizeable that it is her who is dancing. And also the space where we took the pictures looks very different after the editing.

Not a very naturalistic image of my model!
In these pictures as with other series I maintained the workflow that I found (or that found me) in order to have a coherent series for an outcome. I used a “modern5” preset in Lightroom to desaturate the pictures and then transferred them to Photoshop where I used the Analogue Efex plug-in app of the Nik collection. Here I created a preset that I re-utilized on many of the subsequent pictures. I don’t stick too strictly to one workflow though to allow for some variety in the series.
After completing them in Analogue Efex I applied in some pictures some additional blur in Photoshop before transferring them back to Lightroom. There some additional local adjustments, some color grading and use of texture and clarity as needed.
When I looked at the series after the editing I was wondering if I could discover the “Inner Core” in them. I noticed that I could see something that often looked very different from the Sarah that I had experienced during our pre shooting meeting at a bar and also during the shooting itself. I asked Sarah to tell me if she finds herself in these pictures and if the “other Sarah” is somebody that she recognizes as herself. I will add her response to this article.

The “other” Sarah

A naturalistic portrait of Sarah, shot during the session at Thistle Hall
Particularly with this series I was surprised how strongly and independently the pictures guided me into the way the wanted to be processed. As artists we need to have a certain ability to sense what is needed to complete our work and to create mood and consistency in series. Over the years I have the feeling that my relationship with my pictures (and also with my models) has become more intense and more intimate. Something happens during the shooting and in the subsequent process that “hooks me on to them”. And this “something”, this intuition, this human touch is something that I like very much. It enriches me and adds something beautiful to my life.
Sarah - The Inner Core Shooting Experience in Wellington New Zealand
Blog article about the photo shoot with Sarah at Thistle Hall, Wellington for the “Inner Core Project”.
Read MoreLeica Q2 - what is it good for?
Blog article about the high quality files that the Leica Q2 creates. A description of how these files enable creative photo editing.
Read MorePiraeus Night Ride - a shooting and editing experience with the Leica Q2 and Nik Color Efex
It took me 8 months to edit the pictures.
In May 2020 I took a night ride through Piraeus, Athen’s harbor city with my Greek friend Alex. On our way back from a trip on the island of Salamina he suggested us to drive through the dark city of Piraeus. He wanted to show me the city and I took out my Leica Q2 camera and started shooting from the passenger seat.
I set the camera to auto ISO, the aperture to f1.7 and the exposure time to 1/50 seconds. And I started shooting into the night lit streets and the traffic that we encountered.
It became a fascinating experience. We were driving through dark suburban streets where we found islands of light that appeared in front of us and disappeared again within one or two seconds. I shot picture after picture, aware that with the relative slow exposure time of 1/50 seconds I would have some blur effect (in order to “freeze” a scene that you shoot from a driving car you need to use at least 1/250 second, better 1/500 or even shorter).
I uploaded the RAW pictures in the following week to my external hard drive, created the usual backup files on a second external hard drive and then I didn’t touch them for a few weeks.
When revisiting the pictures for the first time I found them a little boring and did not know what exactly to do with them. The motion blur was kind of interesting but it did not give the pictures shape and and any fascinating feeling. I processed some of the pictures, posted some on Flickr but neither me nor my followers were particularly interested in the results.

Not bad - but not really interesting either……

Kind of moody - but something is missing…..
And then I forgot about them. I had many other interesting subjects to shoot and I did my editing of these pictures. The Piraeus ones were on the hard drive and I did not touch them.
8 months later I accidentally came across he pictures again. And immediately I knew what to do. I had just worked with the Nik editing apps recently. So I took the RAW pictures, transferred them to Nik Color Efex where I applied some presets that suited the dark, moody atmosphere of the night and the environment.
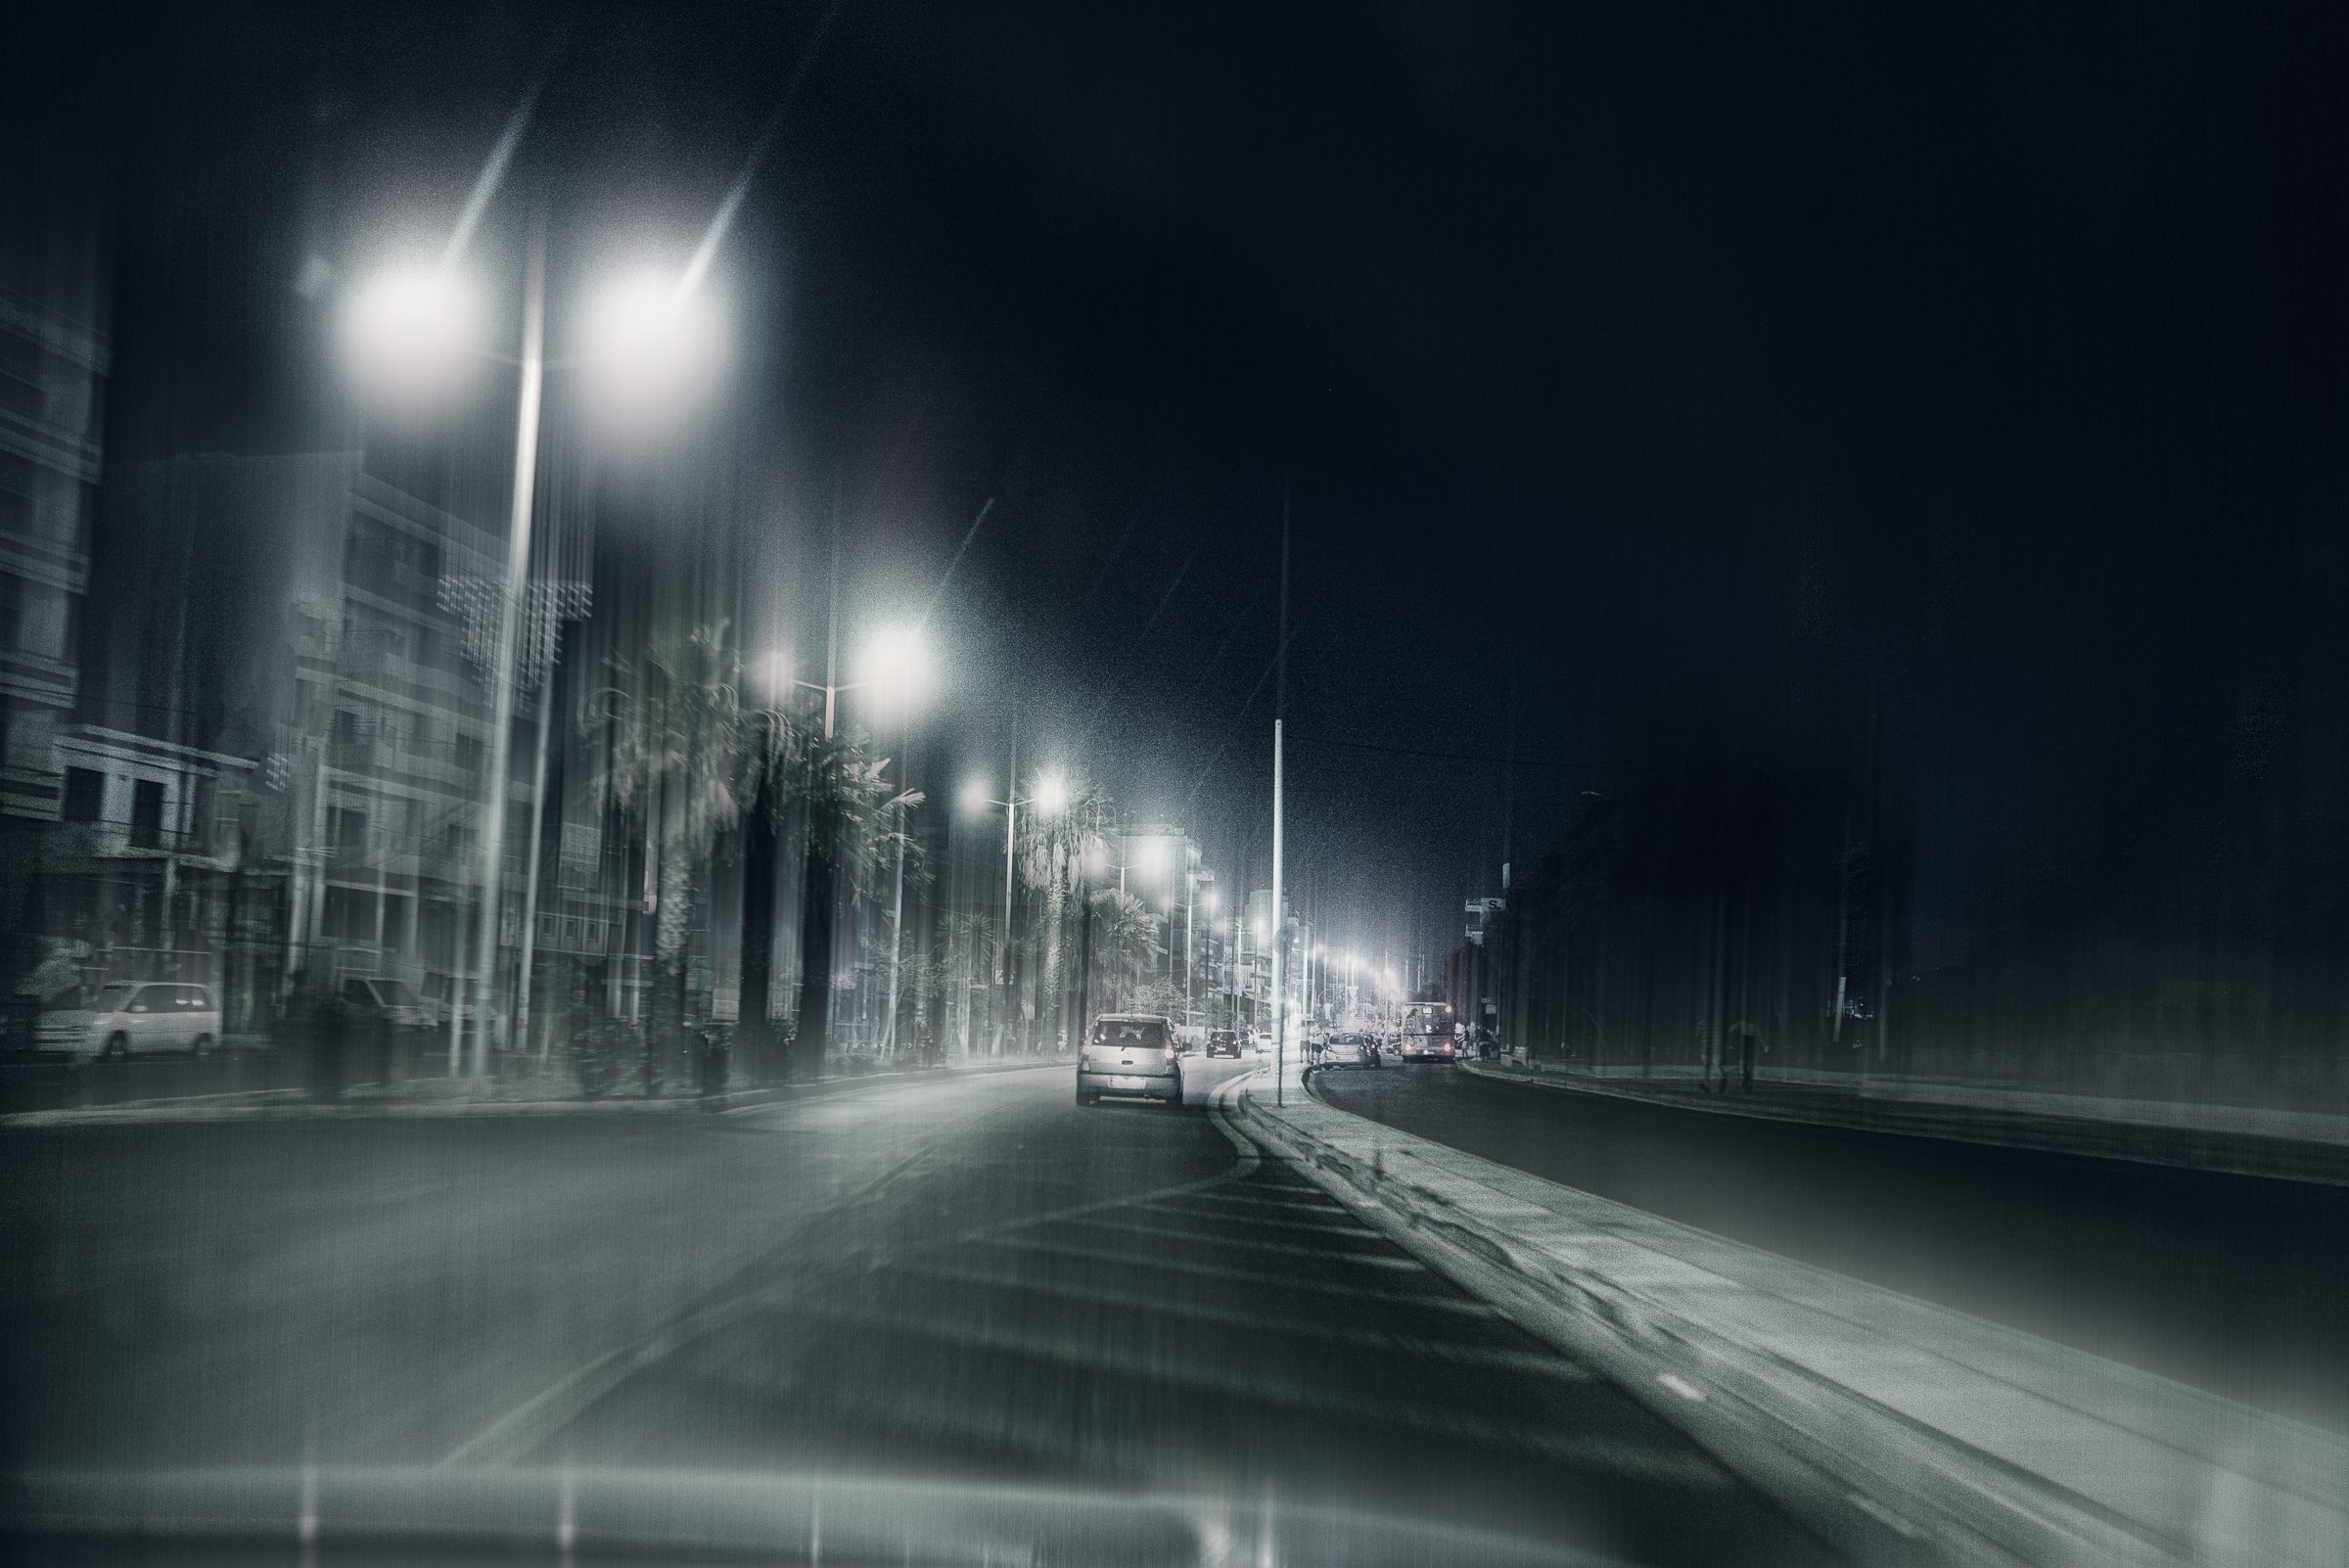
Thew same picture with a new edit
In a second step I exported the pictures to Photoshop where I used the blur tools to enhance the motion blur effect that the pictures already had.

Color cast and blur effect
And in a last step I added some texture and clarity in lightroom and did some local enhancements of light and colors. The editing of each single picture took me between 15 and 30 minutes. That includes the time I sometimes took between step 2 and 3 in order to re-evaluate my results and to start doing my local adjustments in Lightroom.
And all of a sudden the pictures had a feel that reflected the mysterious atmosphere that we had experienced during the ride through the city of Piraeus.
We often read the recommendation to let the pictures “mature” after the shooting and to let them “rest” for a while. I often don’t follow that recommendation. But in this case leaving the pictures alone and coming back with fresh and unbiased eyes gave me the opportunity to create a completely new and different approach. Revisiting the older ones can make a lot of sense. I love the results……
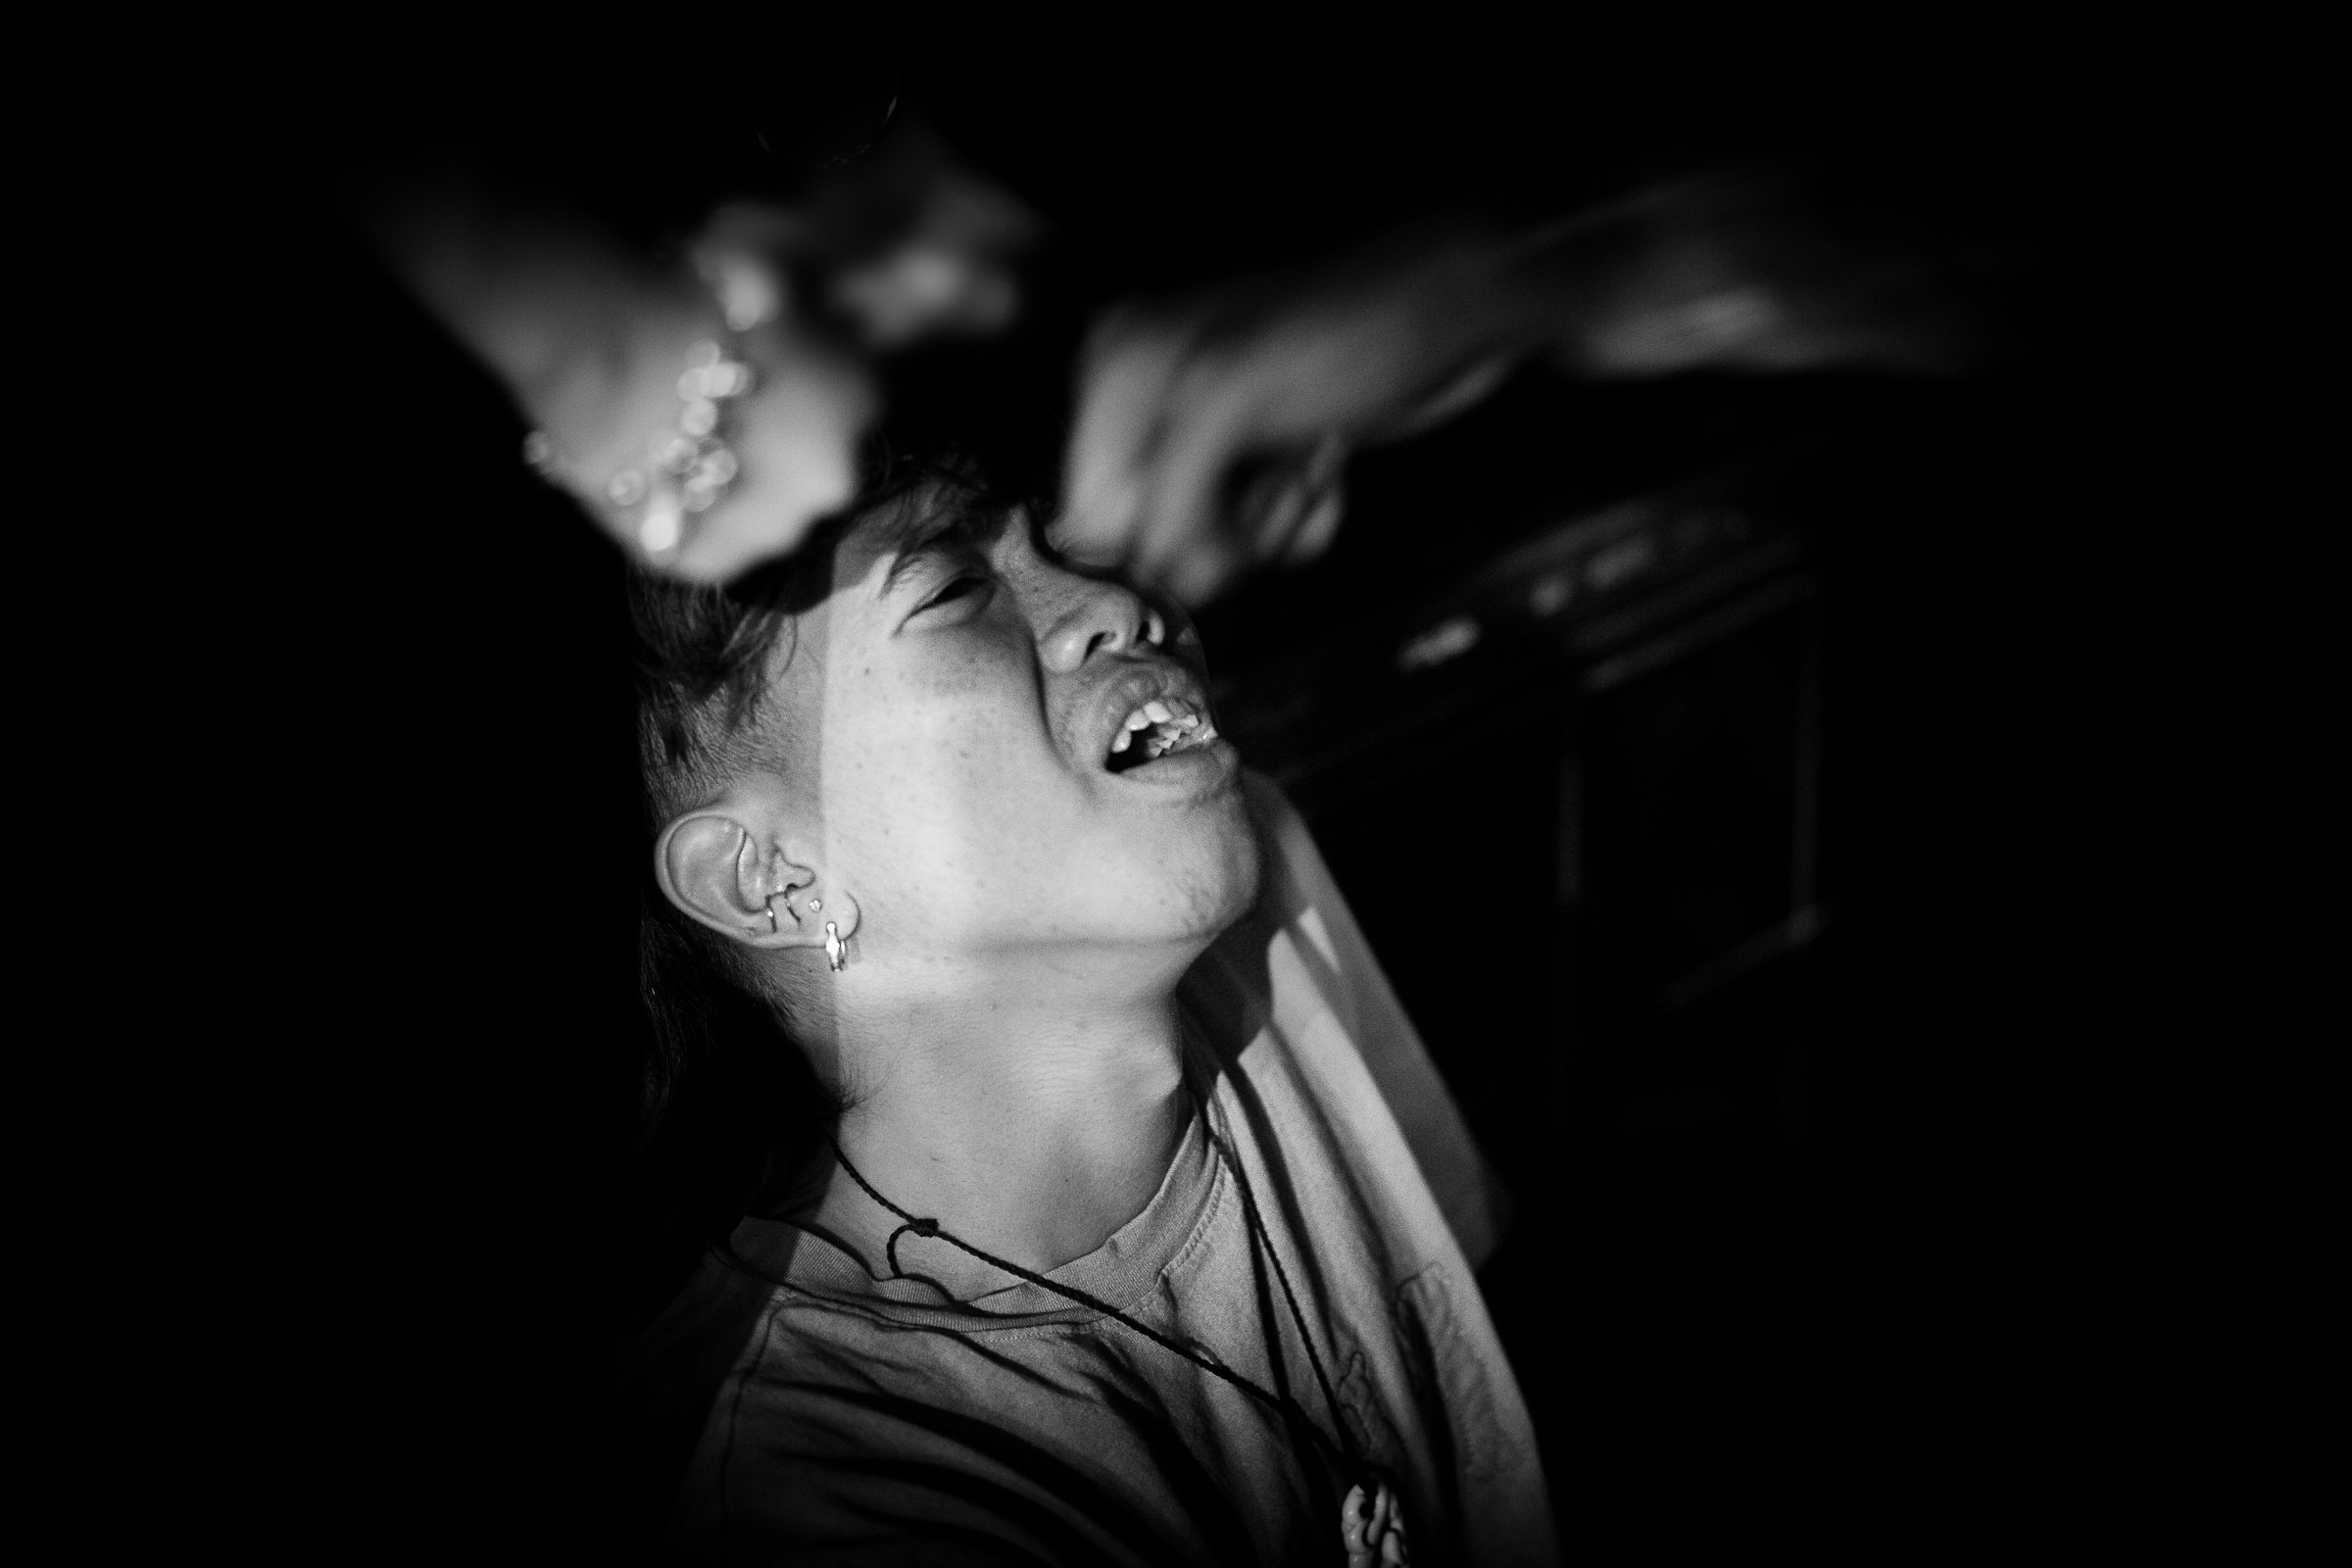
Street documentary photography - What is reality?
An article about a dramatic street photograph that seemingly shows a brawl and a young man being attacked and injured. Is that what happened? Is that reality?
Read MoreThe Difficult Ones - Street Portraits of "Scary People"
When I shot street portraits during New Year’s Eve in Wellington I had some moments when I encountered people that I would usually regard as “difficult to shoot” because their outer appearance is “scary” and doesn’t invite to asking them if they agree to having their portrait taken.
I am far from being a bold street photographer. I will never become a second Bruce Gilden. Gilden is an example for an “into the face” street photographer who doesn’t have any inhibitions at taking peoples’ pictures. I find it difficult to get into the flow and to convince myself to take the first step of approaching people to take their picture. I actually find it easier to shoot a person with who I have an appointment for a photo shoot because in that case the question “does he/she want it or not” has already been answered. But of course that approach doesn’t have the spontaneity that you find in street portraits.
So what about the “difficult ones”? During the NYE shooting I remember shooting two people that I found difficult to approach. One was the bouncer at a party establishment, the other one was a guy who was sitting on the edge of a flower bed in Wellington’s pedestrian zone. He was heavily tattooed, made a brooding impression and and it felt as if he would not be very approachable. But man, he looked interesting!!

I was lucky because I was in the flow. I had been shooting for half an hour and it had been fun and I had enjoyed this experience a lot. People were friendly, easy to approach, often a little drunk but not completely pissed, so I was in a real nice photographic flow.
So I just went over to him and knelt in from of him, holding my big Nikon D850 DSLR camera and asked him “would it be ok if I took your picture?” He looked at me and answered in a relaxed way “Sure, no problem.” He took his cigarette, had a deep drag and stared broodingly straight ahead. I was more than surprised. I made use of the kneeling pose that I had taken in from of him and shot him right from where I was in front of him. So I had this slightly lower perspective that helped with the expression of the picture.
The experience with this picture showed a very simple photographic rule. “You never know before you ask people”. And that is certainly an encouragement for a slightly more daring approach to taking street portraits.
What helped me very much was “the flow” I was in. I think it might be a good idea of describing this experience and how it evolved on that particular evening a little more in depth. I will do that soon in a separate article.
Happy New Year! - Street Portraits on New Year's Eve in Wellington, New Zealand
I had nothing better to do. On New Year’s Eve I decided that I wanted to visit the city centre of Wellington to catch some street portraits of the party goers in the hours before midnight. So I put my Nikon D850 in my bag, put the Nikkor 85mm f1.8 lens on that I use for portrait shooting and started into the night.
My starting point was not overly good. I was not in the mood for party nor to meet people and to converse. But I did want to shoot. Initially I could not even be bothered to take my camera out of my bag. But then I sat down next to an amazing blues guitar player in the pedestrian zone of Cuba Street. This blues man invited me to shoot him while playing. So I sat down opposite to him and started shooting. And next to me on that bench was sitting a little guy with tattoos all over the face, the smell of cheap wine coming from his mouth. He started talking to me in a mix of English and German language. And he made me aware of the “dangerous two guys over there that are for sure American spies. That broke the ice. :-)
I was sitting there, taking picture of the musician, of people sitting around him on benches. And then I took off, walking back into the party zone at Coutney Place. And all of a sudden I was “in the flow”. I sought eye contact with the people coming towards me, started asking them for their picture. The atmosphere was easy going, people where already a little tipsy and in relaxed and beautiful mood.
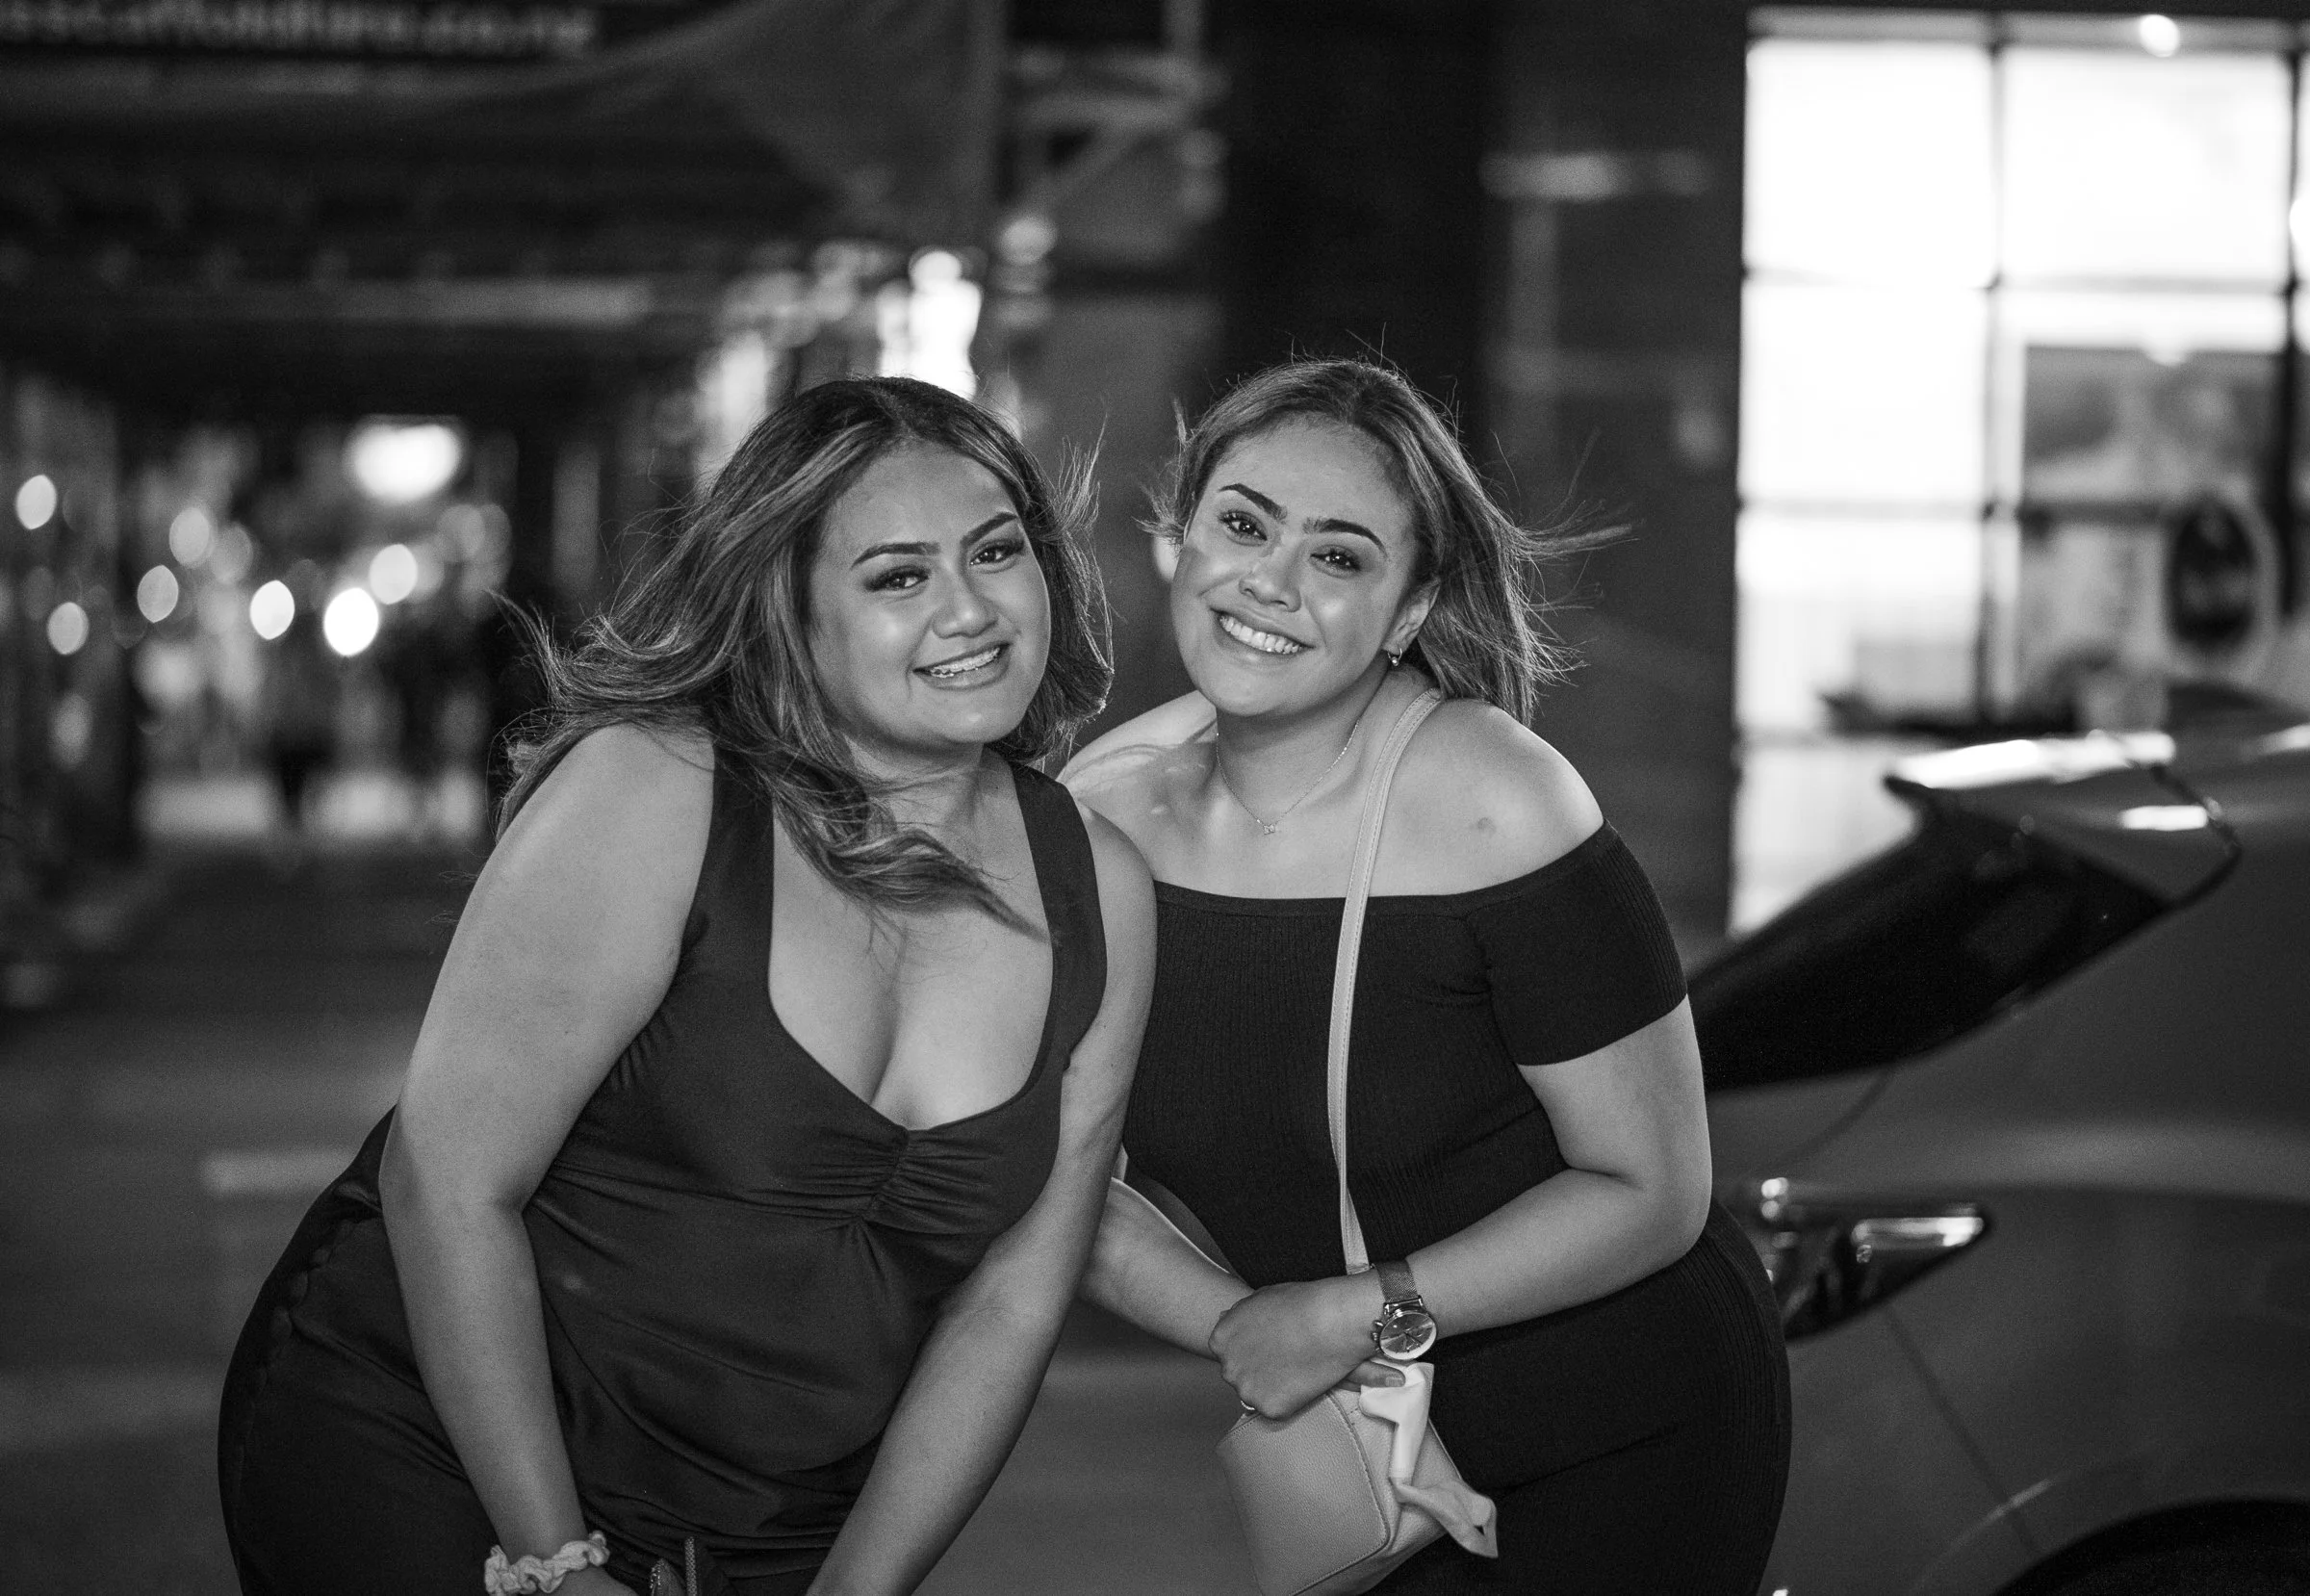
It really flowed. I walked down the place on both sides into all directions. And then I met those girls. They had a little too much alcohol, no doubt. And they showed me the Haka. Right into my camera. Full on. I was blown away and exacted two pictures.

Do you know the Haka…?
And it went on and on. Surprising and sometimes a little annoying was that nearly everybody that I shot took on a pose immediately. They are all Instagram trained!! Everybody does it. They put their heads together, hands up, fingers spread and smiiiile. It is as if everybody had the same trainer that told them how to take on the “right pose”. It is incredible.
I stayed in the flow for 2 and a half hours. Until I was really empty. Until I had really all the pictures I wanted. Until I was really happy.
The Sweeties

The Bouncer
HAPPY NEW YEAR!!
RICOH GR III - Strong Contrast Black and White Pictures - Wellington at Dusk
Recently I went out late in the afternoon when dusk was starting to fall. I had my little GR III camera with me that I had put on high contrast JPEG shooting mode.
My idea was to shoot some contrasty pictures of the city (it is Wellington, New Zealand that we are speaking about) in the fading light, maybe using some street lights, maybe utilizing the light from the sky.
I hadn’t tried the strong contrast JPEG preset in that way before. I had shot some pictures on a beach and I liked the rendering of the dark tones. It complemented my style quite nicely. So trying this in the urban environment was a nice little challenge.
And I was lucky, I got into the flow.
You know the photographic flow? You immerse yourself into your shooting and all of a sudden nothing exists but pictures, scenes that want to be captured, light, contrast, maybe colors, a flurry of impressions that wait to be photographed.

This kind of flow lasts with me between an hour and two. Towards the end I feel that I am getting tired. It’s hard mental work, it is focusing on the environment and on composition and light all the time. Eventually by the end of a flow I get to the point where I feel that I have “shot myself empty”. The flow abates gradually, the rush ceases, the inclination to find yet another motif stops.
I love those moments of getting into the flow. It’s immensely gratifying and rewarding. And often the pictures that are shot in such a flow are good or even excellent. It’s a special mode and mood.
So, in such a flow I got myself during the JPEG shooting session. I found a narrow alley with wooden fences to both sides and, a street light and the bright sky at the end of this path. I shot this in many iterations. I will later come back to this motif.
At the end of my two hours walk I was indeed empty and my SD cart had filled up to a good degree. And I had the feeling of satisfaction and curiosity about what I might have found. I was keen on sitting down and processing my pictures and getting them ready to be shown on Flickr.
Flickr is a great motivation for me. The fact that I can show what I deem the best pictures in Flickr motivates me to shoot and to try out new ways of photography. Over the past 8 years this fascination and motivation has been continuing. Flickr is a great source of inspiration to me.
When I started editing the pictures on my computer I found out that they don’t have great “latitude”. This means that when playing with exposure, highlights, whites, shadows and blacks in post, the pictures tend to develop unnaturally looking white or grey areas that just don’t look appealing at all. Reason for that is that the pictures were shot in JPEG format which limits the way of editing them considerably. The pictures I took of the before mentioned fenced path suffer from this technical flaw.

The image looks nice. But if you take a closer look you can see that Whites and Greys have in some areas an unnatural look
The easiest way of circumventing this problem was to darken the pictures, to increase whites and to make local adjustments to the areas that should appear bright. In that way it was possible to create some pictures that obtained a graphical character.

The areas where I increased the Whites appeared bright and luminant and created a beautiful contrast with the dark or grey environment. This luminance you can indeed only achieve by editing JPEG pictures. RAW files are too flexible and do not “tip over” into very bright or deep dark tones, This only happens when we use JPEG pictures.
Sometimes it requires a little bit of luck (bad and good one) to achieve a certain look in pictures.
The Leica Q2 - it is that good!
Recently I have been shooting a lot with the Leica Q2. I used it for shooting portraits and very recently also for shooting pictures on a mountain very close to Athen’s city center. Together with my Flickr friend Alex we went on a trip to explore this interesting place (or I should rather say that he took me to a place that he knew well in order to give me the opportunity to experience it and take pictures - thank you very much, Alex! :-) ).
So what happened with regard to this camera? Well, it’s very simple - the photographic results from this little “field trip” are absolutely amazing.
I took pictures of the stunning view over the city of Athens and the Saronic Gulf. Shooting directly into the sunlight yielded amazing results. The camera was able to handle the strong contrasts and I could process the pictures by maintaining the contrast, playing with the colors and without encountering any banding that you would often find in backlit pictures with strong contrast.

View over the Saronic Gulf, Athens, Greece
When I took pictures of an abandoned building, shooting from dark rooms into the light outside I was able to recover the shadows and colors inside without any problems. Colors were beautiful, I could edit them even at relative high ISO of 3200 without creating any smear or ugly high ISO grain. I was amazed about the outcome.

High ISO interior shot of an abandoned building. The blur of the foreground is caused by focussing on the rear area with wide open lens (f/1.7).
When judging an expensive camera it always comes back to the question if this camera “is worth it”. For me I can answer this with a clear “yes”. This is simply the best camera I have ever worked with. It is a handy, small tool that is fun using, that does not get in your way and that yields amazing pictures. It simply is that good.
You find examples for Leica Q2 work in the “latest work” picture gallery https://www.chris-r-photography.net/latest-work and also in the “Inner Core Project” gallery https://www.chris-r-photography.net/inner-core .
Editing Portraits
Portraits are the attempt of capturing the essence, the personality of a person. Of course this is one of the most difficult tasks in photography. And of course there will never be a really satisfying answer to the question how to do that. On the other hand - there are really nice approximations by really good photographers out there.
Shooting portraits means on the one hand that we try to achieve the goal of “portraying a person” in camera. And by influencing light, composition, mood, and interaction with our models we lay the foundations of this work. But there is also the aspect of editing portrait pictures in a way that underlines the character of the portraitee (does that word exist?) and brings out features that we want to emphasise.
For my own portrait shooting I found out that a “one fits it all” editing process doesn’t work. People are so different that using just one editing workflow for all types of portraits does not suffice. So I try to develop one processing workflow for each portrait session that I do. I found out that I need to sit down after the photoshoot, take a close look at the raw material and start playing with the pictures on my computer. It usually takes me some hours to decide how exactly I want to edit the series that I have created.
As many viewers know, I am mainly a black and white photographer, particularly when this is about portrait photography. I find monochrome portraits more expressive. By leaving away color the features and character of a person come out more intensely. This is certainly not a new insight, this question has been discussed for generations.
For my portrait developing process I use mainly 4 tools. I saved and organise my pictures in Lightroom. For conversion from color to black and white I use Photoshop, Silver Efex Pro or, as my latest tool, Luminar AI. (It might actually not be a bad idea to write about Luminar AI a separate article to take a look at what this “intelligent” software is able to accomplish.)
In Photoshop I use mainly solid color adjustment layers for b&w conversion. I find that they give very nice grey tones with soft contrasts that can even be further tweaked by using curves, gradient maps or channel mixer layers. So I use this conversion pathway for pictures where I want to achieve a softer b&w look.
For raw and gritty b&w conversions I use Silver Efex Pro. My favourite preset is Film Noir I which creates strong contrasts with interesting grain. As with all presets this preset is only a starting point and depending on the goal I want to achieve I would change brightness, contrast and amount of grain.
Luminar AI is a new player in the field (at least it is with its new “intelligent” software). Some black and white conversions presets in Luminar are quite usable and the grain is quite pleasing. I also use Luminar if I want to tweak eyes, lips or skin after converting in Photoshop or Silver Efex. Because the Luminar software recognises facial features it is very easy to edit eye expression or darkness of the lips. In some cases the skin correction tool can also replace Frequency Separation (which is a time consuming process to embellish the skin that can be done in Photoshop).

Lina, portrait shoot. This picture is an extreme example for softening the expression by applying blur. This is certainly a matter of taste, you could easily say that the softness is bordering to Kitsch. I heard somebody say that “this is very much 80’s”. I would not disagree…. :-)
After all I find that editing should follow the character of a person that I find during the photo shoot and in the pictures. An example is my recent shoot with Lina in Athens. Lina appeared to be a very delicate character with subtle beauty and expression. Her characteristics lead me to using the “soft” solid color adjustment layer process in Photoshop. I combined that by even adding more softness to the pictures by using Gaussian blur on many parts of the pictures. Applying blur all over the picture and then removing the blur from the face and parts of the body by “painting in black” in Photoshop is the method I am using. (If you have questions about this process, please don’t hesitate to send me a Flickr Mail or write me a message here on the website.)
Processing pictures to enhance their expression and to help telling a story has become integral part of my photography. And I enjoy it, I enjoy reading portraits and trying to find a way of showing the character of a person.